こんにちは。広瀬マサルです。
Flutter上で動作する統合フレームワークMasamuneを随時更新しています。
今回はデータモデル周りに新しいアップデートがさらにあったので紹介します。
masamune
はじめに
Masamuneフレームワークは「CLIによるコード生成」と「build_runnnerによるコードの自動生成」を用いて可能な限りコードの記述量を減らし、アプリ開発の安定性と高速性を高めるFlutter上のフレームワークです。
データベースに関してもFirestoreをベースにしたNoSQLデータベースを利用し、わずか1行の更新でランタイムDBと端末ローカルDB、Firestoreを切り替えることが可能な仕組みを提供しています。
以前下記の記事でModelAdapterを各データモデルごとに設定可能になったと書きました。
今回はさらにGoogleスプレッドシートから取得したデータを利用可能なModelAdapterが追加されました。
アプリの設定をアプリ内だけでなくGoogleスプレッドシートに記述することができ、FirestoreやローカルDBとリレーションを繋げながら同じようなデータとして扱うことができるようになります。
Googleスプレッドシートでデータを記載する利点
アプリの設定をソースコード内に書かずにGoogleスプレッドシートに記載する利点は主に下記三点です。
- ソースコードの記述を減らせる
- オンラインで編集できる
- 非エンジニアでも編集できる
特に3が重要です。アプリの発注者や運営者といった社外の方やPdMやPjMといった社内の人間も非エンジニアであることが多くソースコードを直に弄ることができません。
その点Googleスプレッドシートなどの表計算ソフトはビジネスマンであれば誰でも触ったことがあるソフトウェアなので扱いやすく作業を依頼しやすいです。
例えば、ECアプリの必要カテゴリーについてはマーケティングとの依存性が強くそちらの業務を行っているメンバーが直に記載するのが理にかなっています。
Googleスプレッドシートに直接データを記載してもらうことで他メンバーとエンジニアとのコミュニケーションコストを減らしエンジニアの工数も減らしてくれるでしょう。
Masamuneフレームワークではすでに翻訳をGoogleスプレッドシートで管理するようにしています。
これは翻訳作業をエンジニアではなく翻訳家が行いやすい形で依頼できるようにします。
事前準備
事前にGoogleスプレッドシートを利用可能にします。
-
こちらのテンプレートからスプレッドシートを自分のGoogleドライブにコピーします。
-
CollectionModelPathを利用する場合はコレクション用のシートを利用し、DocumentModelPathを利用する場合はドキュメント用のシートを利用します。 -
ファイル->コピーの作成からコピーが可能です。
-
-
コピーしたスプレッドシート内で
ファイル->共有->他のユーザーと共有をクリックします。 -
(作成したスプレッドシート名)を共有ウィンドウ内で、一般的なアクセスをリンクを知っている全員に変更します。
実際にやってみよう
それでは実際の実装を行っていきたいと思います。
今回は簡易的にECショップの商品やカテゴリーをスプレッドシートに定義し、それを購入して履歴に残すデモアプリを作成していきます。
プロジェクトの作成
まずkatana createでプロジェクトを作成します。
katana create net.mathru.csvtest少し待てばプロジェクトファイルが作成されます。
スプレッドシートデータの作成
まずはスプレッドシートでデータを作成していきましょう。
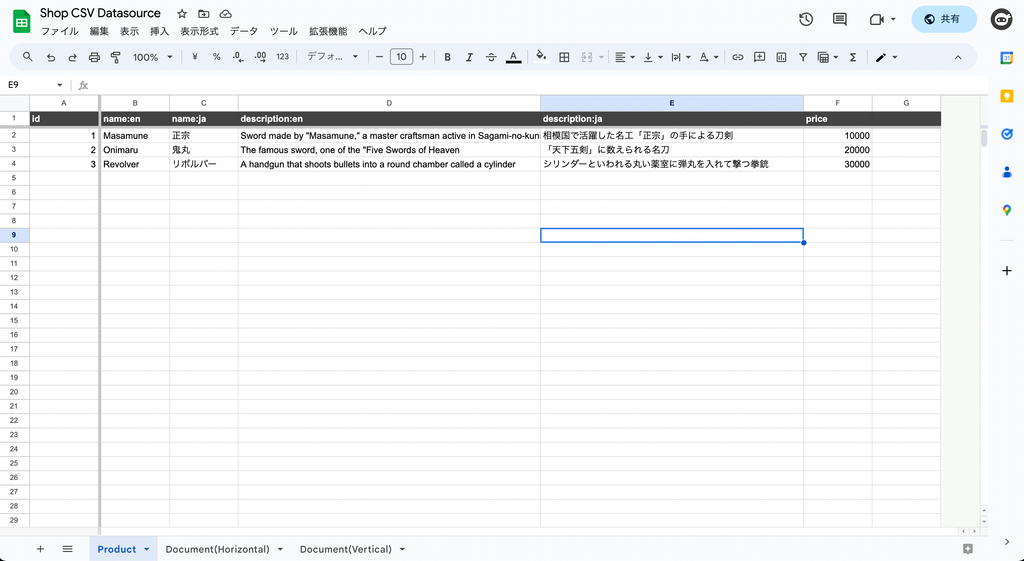
シート名をProductに変え下記のようにデータを記述していきます。
翻訳を分けたい場合はname:enのようにキー:言語コードで分けてデータを登録してください。

モデルの作成
Flutterプロジェクト内にもどり続いて各種データモデルを作成していきましょう。
まずCLIでコードを生成します。
# 商品データ
katana code collection product
生成されたDartファイルを編集します。
GoogleSpreadSheetDataSourceの中にはGoogleスプレッドシートのProductシートを開いているときのURLを記述します。
スプレッドシートに翻訳を登録した場合は、ModelLocalizedValueを使って値をまとめることができます。
// models/product.dart

/// Value for model.
@freezed
@formValue
@immutable
// TODO: Set the path for the collection.
@CollectionModelPath("product")
@GoogleSpreadSheetDataSource(
  "https://docs.google.com/spreadsheets/d/1HojG5QzScb8b0EB1HvHHN11yaTEf2hwwtrrUwBI5U38/edit#gid=0",
  version: 1,
)
abstract class ProductModel with _$ProductModel {
  const factory ProductModel({
    // TODO: Set the data schema.
    required int id,
    @Default(ModelLocalizedValue()) ModelLocalizedValue name,
    @Default(ModelLocalizedValue()) ModelLocalizedValue description,
    @Default(0.0) double price,
  }) = _ProductModel;
  const ProductModel._();

  ~~~~
}
下記コマンドでbuild_runnerによる自動生成を行います。
katana code generateこれでCSV内のデータがソースコードに適用されます。
商品一覧ページの作成
下記コマンドで商品一覧ページを作成します。
katana code page product
商品一覧を表示するように書き換えます。
// pages/product.dart

@immutable
// TODO: Set the path for the page.
@PagePath("product")
class ProductPage extends PageScopedWidget {
  const ProductPage({
    super.key,
    // TODO: Set parameters for the page.
  });

  // TODO: Set parameters for the page in the form [final String xxx].

  /// Used to transition to the ProductPage screen.
  ///
  /// ```dart
  /// router.push(ProductPage.query(parameters));    // Push page to ProductPage.
  /// router.replace(ProductPage.query(parameters)); // Push page to ProductPage.
  /// ```
  @pageRouteQuery
  static const query = _$ProductPageQuery();

  @override
  Widget build(BuildContext context, PageRef ref) {
    // Describes the process of loading
    // and defining variables required for the page.
    // TODO: Implement the variable loading process.
    final product = ref.model(ProductModel.collection())..load();

    // Describes the structure of the page.
    // TODO: Implement the view.
    return UniversalScaffold(
      appBar: const UniversalAppBar(
        title: Text("Product List"),
      ),
      body: UniversalListView(
        children: [
          ...product.mapListenable((item) {
            return ListTile(
              title: Text(item.value?.name.value.value(l.locale) ?? ""),
              subtitle:
                  Text(item.value?.description.value.value(l.locale) ?? ""),
              trailing:
                  Text("¥${item.value?.price.toStringAsFixed(0) ?? "0"}"),
            );
          }),
        ],
      ),
    );
  }
}
main.dartのinitialQueryを変更します。
// main.dart

/// Initial page query.
// TODO: Define the initial page query of the application.
final initialQuery = ProductPage.query();
このままビルドして確認してみます。
一覧が表示されました!

カテゴリーの追加
まずGoogleスプレッドシートにCategoryのシートを作成し、下記のように編集します。

また、Productのシートにcategoryの項目を追加しリレーションデータを記載します。
リレーションデータは下記のフォーマットで書くことができます。
ref://[コレクション名※アプリ内で指定]/[対象のID]今回のデータだと下記のようになります。
| リレーションデータ | 英語名 | 日本語名 |
| ref://category/1 | Katana | 刀 |
| ref://category/2 | Gun | 銃 |

Flutterプロジェクトに戻りCLIでコードを生成します。
katana code collection category
生成されたDartファイルを編集します。
GoogleSpreadSheetDataSourceの中にはGoogleスプレッドシートのCategoryシートを開いているときのURLを記述します。
// models/category.dart

/// Value for model.
@freezed
@formValue
@immutable
// TODO: Set the path for the collection.
@CollectionModelPath("category")
@GoogleSpreadSheetDataSource(
  "https://docs.google.com/spreadsheets/d/1HojG5QzScb8b0EB1HvHHN11yaTEf2hwwtrrUwBI5U38/edit#gid=653415878",
  version: 1,
)
abstract class CategoryModel with _$CategoryModel {
  const factory CategoryModel({
    // TODO: Set the data schema.
    required int id,
    @Default(ModelLocalizedValue()) ModelLocalizedValue name,
  }) = _CategoryModel;
  const CategoryModel._();

  ~~~~
}
また、models/product.dartにCategoryModelへのリレーションの追加とデータを更新するためのGoogleSpreadSheetDataSourceのversionを増やします。
他のデータのリレーションを作成するためには@refParamのアノテーションを付与してModelRefBaseを継承したクラス(今回はCategoryModelRef)の型を指定します。
// models/product.dart

/// Value for model.
@freezed
@formValue
@immutable
// TODO: Set the path for the collection.
@CollectionModelPath("product")
@GoogleSpreadSheetDataSource(
  "https://docs.google.com/spreadsheets/d/1HojG5QzScb8b0EB1HvHHN11yaTEf2hwwtrrUwBI5U38/edit#gid=0",
  version: 2,
)
abstract class ProductModel with _$ProductModel {
  const factory ProductModel({
    // TODO: Set the data schema.
    required int id,
    @Default(ModelLocalizedValue()) ModelLocalizedValue name,
    @Default(ModelLocalizedValue()) ModelLocalizedValue description,
    @Default(0.0) double price,
    @refParam CategoryModelRef category,
  }) = _ProductModel;
  const ProductModel._();

  ~~~~
}
下記コマンドでbuild_runnerによる自動生成を行います。
katana code generate
pages/product.dartでカテゴリーをあわせて表示しましょう。
// pages/product.dart

@immutable
// TODO: Set the path for the page.
@PagePath("product")
class ProductPage extends PageScopedWidget {
  const ProductPage({
    super.key,
    // TODO: Set parameters for the page.
  });

  // TODO: Set parameters for the page in the form [final String xxx].

  /// Used to transition to the ProductPage screen.
  ///
  /// ```dart
  /// router.push(ProductPage.query(parameters));    // Push page to ProductPage.
  /// router.replace(ProductPage.query(parameters)); // Push page to ProductPage.
  /// ```
  @pageRouteQuery
  static const query = _$ProductPageQuery();

  @override
  Widget build(BuildContext context, PageRef ref) {
    // Describes the process of loading
    // and defining variables required for the page.
    // TODO: Implement the variable loading process.
    final product = ref.model(ProductModel.collection())..load();

    // Describes the structure of the page.
    // TODO: Implement the view.
    return UniversalScaffold(
      appBar: const UniversalAppBar(
        title: Text("Product List"),
      ),
      body: UniversalListView(
        children: [
          ...product.mapListenable((item) {
            return ListTile(
              title: Text(item.value?.name.value.value(l.locale) ?? ""),
              subtitle: Text(
                  "${item.value?.category?.value?.name.value.value(l.locale) ?? ""}\n${item.value?.description.value.value(l.locale) ?? ""}"),
              trailing: Text("¥${item.value?.price.toStringAsFixed(0) ?? "0"}"),
            );
          }),
        ],
      ),
    );
  }
}
これでビルドしてみると無事カテゴリーが表示されていることがわかります。

カテゴリー別のページを表示
現在のページをカテゴリー別に表示するように改造しましょう。
まずはpages/product.dartを編集します。
categoryIdを引数で受け取るようにし、ProductModelをコレクションをcategoryでフィルタリングするようにします。
@immutable
// TODO: Set the path for the page.
@PagePath("product/:category_id")
class ProductPage extends PageScopedWidget {
  const ProductPage({
    super.key,
    // TODO: Set parameters for the page.
    @pageParam required this.categoryId,
  });

  // TODO: Set parameters for the page in the form [final String xxx].
  final String categoryId;

  /// Used to transition to the ProductPage screen.
  ///
  /// ```dart
  /// router.push(ProductPage.query(parameters));    // Push page to ProductPage.
  /// router.replace(ProductPage.query(parameters)); // Push page to ProductPage.
  /// ```
  @pageRouteQuery
  static const query = _$ProductPageQuery();

  @override
  Widget build(BuildContext context, PageRef ref) {
    // Describes the process of loading
    // and defining variables required for the page.
    // TODO: Implement the variable loading process.
    final category = ref.model(CategoryModel.document(categoryId))..load();
    final product = ref.model(
      ProductModel.collection().category.equal(category),
    )..load();

    // Describes the structure of the page.
    // TODO: Implement the view.
    return UniversalScaffold(
      appBar: const UniversalAppBar(
        title: Text("Product List"),
      ),
      body: UniversalListView(
        children: [
          ...product.mapListenable((item) {
            return ListTile(
              title: Text(item.value?.name.value.value(l.locale) ?? ""),
              subtitle: Text(
                  "${item.value?.category?.value?.name.value.value(l.locale) ?? ""}\n${item.value?.description.value.value(l.locale) ?? ""}"),
              trailing: Text("¥${item.value?.price.toStringAsFixed(0) ?? "0"}"),
            );
          }),
        ],
      ),
    );
  }
}
このようにタイプセーフにフィルター条件を指定することが可能です。
ProductModel.collection().category.equal(category)
一度ここでbuild_runnerによる自動生成を行います。
katana code generate
続いてカテゴリーの一覧ページを作成します。
katana code page category
作成されたページを編集します。
// pages/category.dart

@immutable
// TODO: Set the path for the page.
@PagePath("category")
class CategoryPage extends PageScopedWidget {
  const CategoryPage({
    super.key,
    // TODO: Set parameters for the page.
  });

  // TODO: Set parameters for the page in the form [final String xxx].

  /// Used to transition to the CategoryPage screen.
  ///
  /// ```dart
  /// router.push(CategoryPage.query(parameters));    // Push page to CategoryPage.
  /// router.replace(CategoryPage.query(parameters)); // Push page to CategoryPage.
  /// ```
  @pageRouteQuery
  static const query = _$CategoryPageQuery();

  @override
  Widget build(BuildContext context, PageRef ref) {
    // Describes the process of loading
    // and defining variables required for the page.
    // TODO: Implement the variable loading process.
    final category = ref.model(CategoryModel.collection())..load();

    // Describes the structure of the page.
    // TODO: Implement the view.
    return UniversalScaffold(
      appBar: const UniversalAppBar(
        title: Text("Category List"),
      ),
      body: UniversalListView(
        children: [
          ...category.mapListenable((item) {
            return ListTile(
              title: Text(item.value?.name.value.value(l.locale) ?? ""),
              onTap: () {
                router.push(ProductPage.query(categoryId: item.uid));
              },
            );
          })
        ],
      ),
    );
  }
}
main.dartで初期ページをカテゴリー一覧に入れ替えます。
// main.dart

/// Initial page query.
// TODO: Define the initial page query of the application.
final initialQuery = CategoryPage.query();
下記コマンドでbuild_runnerによる自動生成を行います。
katana code generate
ビルドしてみましょう。


カテゴリー一覧から項目をタップするとその項目でフィルタリングされていることがわかります。
購入履歴の実装
商品をタップすると購入し1度しか購入できないようにしてみましょう。
まずは購入履歴のモデルを作成します。
katana code collection history
生成されたコードを書き換えます。
// models/history.dart

/// Value for model.
@freezed
@formValue
@immutable
// TODO: Set the path for the collection.
@CollectionModelPath("history")
abstract class HistoryModel with _$HistoryModel {
  const factory HistoryModel({
    // TODO: Set the data schema.
    @RefParam(ProductModelDocument) ProductModelRef product,
  }) = _HistoryModel;
  const HistoryModel._();

  ~~~~
}
下記コマンドでbuild_runnerによる自動生成を行います。
katana code generate
pages/product.dartを編集します。
historyのコレクションにプロダクト自身のuidが含まれるかどうかを検証します。
含まれない場合は購入可能としタップするとhisotryのコレクションにプロダクト自身を含めたドキュメントを保存します。
// pages/product.dart

@immutable
// TODO: Set the path for the page.
@PagePath("product/:category_id")
class ProductPage extends PageScopedWidget {
  const ProductPage({
    super.key,
    // TODO: Set parameters for the page.
    @pageParam required this.categoryId,
  });

  // TODO: Set parameters for the page in the form [final String xxx].
  final String categoryId;

  /// Used to transition to the ProductPage screen.
  ///
  /// ```dart
  /// router.push(ProductPage.query(parameters));    // Push page to ProductPage.
  /// router.replace(ProductPage.query(parameters)); // Push page to ProductPage.
  /// ```
  @pageRouteQuery
  static const query = _$ProductPageQuery();

  @override
  Widget build(BuildContext context, PageRef ref) {
    // Describes the process of loading
    // and defining variables required for the page.
    // TODO: Implement the variable loading process.
    final category = ref.model(CategoryModel.document(categoryId))..load();
    final product = ref.model(
      ProductModel.collection().category.equal(category),
    )..load();
    final history = ref.model(HistoryModel.collection())..load();

    // Describes the structure of the page.
    // TODO: Implement the view.
    return UniversalScaffold(
      appBar: const UniversalAppBar(
        title: Text("Product List"),
      ),
      body: UniversalListView(
        children: [
          ...product.mapListenable((item) {
            final purchased =
                history.any((e) => e.value?.product?.uid == item.uid);
            return ListTile(
              title: Text(item.value?.name.value.value(l.locale) ?? ""),
              subtitle: Text(
                  "${item.value?.category?.value?.name.value.value(l.locale) ?? ""}\n${item.value?.description.value.value(l.locale) ?? ""}"),
              trailing: purchased
                  ? Icon(Icons.check_circle, color: theme.color.success)
                  : Text("¥${item.value?.price.toStringAsFixed(0) ?? "0"}"),
              onTap: purchased
                  ? null
                  : () async {
                      final doc = history.create();
                      await doc
                          .save(
                            HistoryModel(
                              product: item,
                            ),
                          )
                          .showIndicator(context);
                    },
            );
          }),
        ],
      ),
    );
  }
}
ビルドしてみましょう。
各プロダクトをタップすると購入済みマークが付くことがわかります。

今回はRuntimeModelAdapterを利用しているのでアプリを再起動すると履歴が失われますがLocalModelAdapterやFirestoreModelAdapterを利用することで購入履歴の永続化が可能です。
詳しくは下記を参照ください。
購入履歴一覧画面の作成
最後に購入履歴一覧画面の作成を行います。
まず購入履歴一覧画面を作成しましょう。
katana code page history
生成されたコードを編集します。
HistoryModelで定義されたproductには関連するProductModelのデータが保存されそのまま取得することができます。
// pages/history.dart

@immutable
// TODO: Set the path for the page.
@PagePath("history")
class HistoryPage extends PageScopedWidget {
  const HistoryPage({
    super.key,
    // TODO: Set parameters for the page.
  });

  // TODO: Set parameters for the page in the form [final String xxx].

  /// Used to transition to the HistoryPage screen.
  ///
  /// ```dart
  /// router.push(HistoryPage.query(parameters));    // Push page to HistoryPage.
  /// router.replace(HistoryPage.query(parameters)); // Push page to HistoryPage.
  /// ```
  @pageRouteQuery
  static const query = _$HistoryPageQuery();

  @override
  Widget build(BuildContext context, PageRef ref) {
    // Describes the process of loading
    // and defining variables required for the page.
    // TODO: Implement the variable loading process.
    final history = ref.model(HistoryModel.collection())..load();

    // Describes the structure of the page.
    // TODO: Implement the view.
    return UniversalScaffold(
      appBar: const UniversalAppBar(
        title: Text("History"),
      ),
      body: UniversalListView(
        children: [
          ...history.mapListenable((item) {
            final product = item.value?.product;
            return ListTile(
              title: Text(product?.value?.name.value.value(l.locale) ?? ""),
              subtitle: Text(
                  "${product?.value?.category?.value?.name.value.value(l.locale) ?? ""}\n${product?.value?.description.value.value(l.locale) ?? ""}"),
            );
          })
        ],
      ),
    );
  }
}
カテゴリー一覧と購入履歴を表示するメニューを作成しましょう。
メニュー用のページをコマンドから作成します。
katana code page menu
作成されたページを編集します。
// pages/menu.dart

@immutable
// TODO: Set the path for the page.
@PagePath("menu")
class MenuPage extends PageScopedWidget {
  const MenuPage({
    super.key,
    // TODO: Set parameters for the page.
  });

  // TODO: Set parameters for the page in the form [final String xxx].

  /// Used to transition to the MenuPage screen.
  ///
  /// ```dart
  /// router.push(MenuPage.query(parameters));    // Push page to MenuPage.
  /// router.replace(MenuPage.query(parameters)); // Push page to MenuPage.
  /// ```
  @pageRouteQuery
  static const query = _$MenuPageQuery();

  @override
  Widget build(BuildContext context, PageRef ref) {
    // Describes the process of loading
    // and defining variables required for the page.

    // Describes the structure of the page.
    // TODO: Implement the view.
    return UniversalScaffold(
      appBar: const UniversalAppBar(
        title: Text("Demo"),
      ),
      body: UniversalListView(
        children: [
          ListTile(
            title: const Text("Category"),
            onTap: () {
              router.push(CategoryPage.query());
            },
          ),
          ListTile(
            title: const Text("History"),
            onTap: () {
              router.push(HistoryPage.query());
            },
          )
        ],
      ),
    );
  }
}
main.dartを編集します。
// main.dart

/// Initial page query.
// TODO: Define the initial page query of the application.
final initialQuery = MenuPage.query();
下記コマンドでbuild_runnerによる自動生成を行います。
katana code generate
ビルドしてみましょう。
起動後、商品をタップしHistoryのページに戻ると購入した商品が表示されていることがわかります。

このようにデータベースからGoogleスプレッドシートのデータソースへのリレーションを作成し内部を意識することなく利用することができます。
おわりに
Googleスプレッドシートを気軽にデータソースとして利用しながら他のデータベースへのリレーションを実現できるため非エンジニアとの連携も行いながらアプリを実装することができるようになりました。
自分で使う用途で作ったものですが実装の思想的に合ってそうならぜひぜひ使ってみてください!
また、こちらにソースを公開しているのでissueやPullRequestをお待ちしてます!
また仕事の依頼等ございましたら、私のTwitterやWebサイトで直接ご連絡をお願いいたします!
GitHub Sponsors
スポンサーを随時募集してます。ご支援お待ちしております!


