こんにちは。広瀬マサルです。
Flutterでアプリケーションを安定して高速に開発することのできるMasamuneフレームワークを紹介しました。
その魅力と使い方を知っていただくためにこれから数回に分けて紹介記事を書きたいと思います。
Masamuneフレームワークを使いこなすことで超高速・安定・高品質なアプリを開発することができるでしょう。
第1回は「プロジェクトの作成」です。
下準備
当然ですがFlutterをインストールしてください。
katana_cliをインストールします。
flutter pub global activate katana_cli
katana doctorを実行し必要なコマンドがインストールされているかチェックしてください。
必要なコマンドがない場合は適宜インストールします。
$ katana doctor

#### Check the installation status of the commands required for the `katana` command.
[o] `flutter` exists at `/Users/xxx/fvm/versions/stable/bin//flutter`
[o] `dart` exists at `/Users/xxx/fvm/versions/stable/bin//dart`
[o] `npm` exists at `/opt/homebrew/opt/node@18/bin/npm`
[o] `git` exists at `/usr/bin/git`
[o] `keytool` exists at `/opt/homebrew/opt/openjdk/bin/keytool`
[o] `openssl` exists at `/opt/homebrew/bin/openssl`
[o] `gsutil` exists at `/opt/homebrew/bin/gsutil`
[o] `pod` exists at `/Users/xxx/.rbenv/shims/pod`

#### Check the installation status of the npm commands required for the `katana` command.
[o] `eslint` exists at `/usr/local/bin/eslint`
[o] `firebase` exists at `/opt/homebrew/bin/firebase`
[o] `lefthook` exists at `/opt/homebrew/bin/lefthook`
[o] `gh` exists at `/opt/homebrew/bin/gh`

#### Check the installation status of the flutter commands required for the `katana` command.
[o] `flutterfire` exists at `/Users/xxx/.pub-cache/bin/flutterfire`
プロジェクトを作成
下準備ができたので早速プロジェクトを作成しましょう!
空のフォルダを作りその下で下記のコマンドを実行します。
katana create [Application ID(e.g. com.test.myapplication)]
今回はnet.mathru.testのアプリケーションIDでアプリを作成します。
katana create net.mathru.test
少しの間待つと初期プロジェクトが作成されます。
完了したらテストビルドしてみましょう。
flutter run --dart-define=FLAVOR=dev
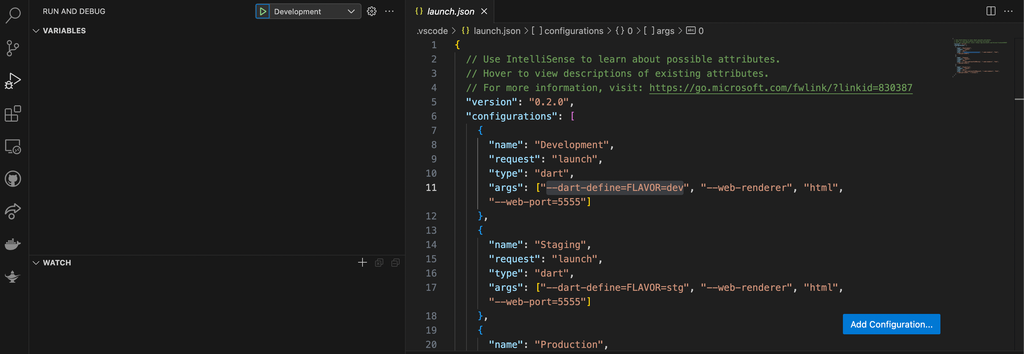
VisualStudioCodeをご利用の場合はlaunch.jsonが作成されるのでそのままF5でデバッグ可能です。

見慣れたカウンターアプリが起動しました。

解説
libフォルダ構成はこのようになります。
./lib
├── adapter.dart
├── config.dart
├── localize.dart
├── localize.localize.dart
├── main.dart
├── models
│   ├── counter.dart
│   ├── counter.freezed.dart
│   ├── counter.g.dart
│   └── counter.m.dart
├── pages
│   ├── home.dart
│   └── home.page.dart
├── router.dart
├── theme.dart
└── theme.theme.dart
この中のmodels/counter.freezed.dart、models/counter.g.dart、models/counter.m.dart、pages/home.page.dart、localize.localize.dart、theme.theme.dartは自動で作成されたファイルなので説明を省きます。
main.dart
アプリのエントリポイントが入ったファイル。
その他アプリのテーマや翻訳、ルーティング、アダプターなどの設定を行うことができます。
こちらに関しては追々説明していきたいと思います。
models/counter.dart
カウンターアプリのモデル部分(データ部分)が記述されているファイル。
Immutableに扱えるオブジェクト(freezed)、Jsonへのシリアライズ・デシリアライズ可能な機能(json_serializable)、そしてそのオブジェクトを通してデータベースへの入出力を可能にする機能(masamune_builder)がまとめて作成されます。
// counter.dart

/// Value for model.
@freezed
@formValue
@immutable
@DocumentModelPath("app/counter")
abstract class CounterModel with _$CounterModel {
  const factory CounterModel({
    @Default(ModelCounter(0)) ModelCounter counter,
  }) = _CounterModel;
  const CounterModel._();

  factory CounterModel.fromJson(Map<String, Object?> json) =>
      _$CounterModelFromJson(json);

  /// Query for document.
  ///
  /// ```dart
  /// appRef.model(CounterModel.document());       // Get the document.
  /// ref.app.model(CounterModel.document())..load();  // Load the document.
  /// ```
  static const document = _$CounterModelDocumentQuery();

  /// Query for form value.
  ///
  /// ```dart
  /// ref.app.form(CounterModel.form(CounterModel()));    // Get the form controller in app scope.
  /// ref.page.form(CounterModel.form(CounterModel()));    // Get the form controller in page scope.
  /// ```
  static const form = _$CounterModelFormQuery();
}
上記コードの下記部分をfreezedやjson_serializableの作法に従ってパラメーターを増やすとそれがデータベースに保存するためのデータスキームになります。
const factory CounterModel({
   @Default(ModelCounter(0)) ModelCounter counter,
}) = _CounterModel;
ModelCounterはカウンティングを行う特殊クラスです。
counter.increment(1)といった形で値を増減することができます。
今回のパターンではintでも問題ないんですが、後々Firestoreを利用する際にコンフリクト(衝突)させずに値をカウンティングさせることが可能になるので非常に便利です。
pages/home.dart
カウンターアプリのビューが記載されているファイル。
// home.dart

@immutable
@PagePath("/")
class HomePage extends PageScopedWidget {
  const HomePage({
    super.key,
  });

  /// Used to transition to the HomePage screen.
  ///
  /// ```dart
  /// router.push(HomePage.query(parameters));    // Push page to HomePage.
  /// router.replace(HomePage.query(parameters)); // Replace page to HomePage.
  /// ```
  @pageRouteQuery
  static const query = _$HomePageQuery();

  @override
  Widget build(BuildContext context, PageRef ref) {
    // Describes the process of loading
    // and defining variables required for the page.
    final model = ref.app.model(CounterModel.document())..load();

    // Describes the structure of the page.
    return UniversalScaffold(
      appBar: UniversalAppBar(title: Text(l().appTitle)),
      body: UniversalColumn(
        mainAxisAlignment: MainAxisAlignment.center,
        crossAxisAlignment: CrossAxisAlignment.center,
        children: [
          const Text(
            "You have pushed the button this many times:",
          ),
          Text(
            "${model.value?.counter.value ?? 0}",
            style: context.theme.text.displayMedium,
          ),
        ],
      ),
      floatingActionButton: FloatingActionButton(
        onPressed: () {
          final value = model.value ?? const CounterModel();
          model.save(
            value.copyWith(counter: value.counter.increment(1)),
          );
        },
        tooltip: "Increment",
        child: const Icon(Icons.add),
      ),
    );
  }
}
下記の行で先程紹介したCounterModelのオブジェクトを取得し、データベースから読み込みを行っています。model.valueにデータベースから読み込まれた値が入りますが、データベースにそもそも値がない場合はnullになります。
データベースからの読み込みが完了したり、更新されたりした場合は適宜ビューが再ビルドされます。
final model = ref.app.model(CounterModel.document())..load();
ここでCounterModelのcounterの値を直接取り出して表示しています。
Text(
  "${model.value?.counter.value ?? 0}",
  style: theme.text.displayMedium,
),
ここでカウントアップを行っています。
データベースに値がない場合はmodel.valueがnullになってしまうのでその場合新しいCounterModelを作成します。
その後、model.saveに保存するCounterModelを渡すことでその値がそのまま保存されます。
final value = model.value ?? const CounterModel();
model.save(
  value.copyWith(counter: value.counter.increment(1)),
);
データの永続化
いまの状態だといつものFlutterのカウンターアプリと同じようにアプリを再起動するとカウントが0に戻ってしまいます。
そこで端末内ローカルDBを作りデータを永続化してみましょう。
adapter.dartを開きmodelAdapterをRuntimeModelAdapterからLocalModelAdapterに入れ替えてください。
// adapter.dart

final modelAdapter = LocalModelAdapter();
// final modelAdapter = RuntimeModelAdapter();
たったこれだけでアプリを再起動してもカウンターの値が0にならずに保持されるようになります。
おわりに
次回はFirestoreを使いアプリを再インストールした場合でもデータを維持できるようにしてみます。お楽しみに!
Masamuneフレームワークはこちらにソースを公開しています。issueやPullRequestをお待ちしてます!
また仕事の依頼等ございましたら、私のTwitterやWebサイトで直接ご連絡をお願いいたします!
GitHub Sponsors
スポンサーを随時募集してます。ご支援お待ちしております!


